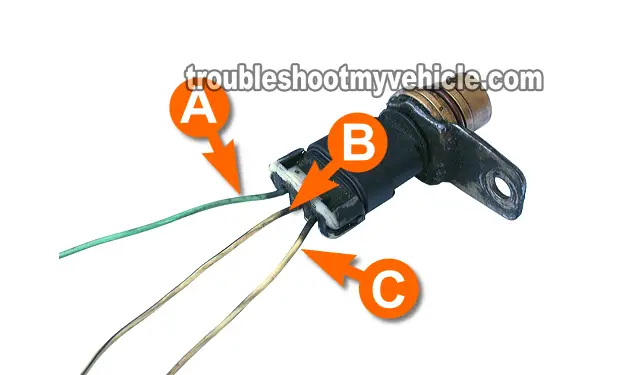
If you need to know if this 3X 18X crankshaft position sensor test applies to your specific 38L GM vehicle take a look at the Applies To box on the right and scroll with the leftright arrow buttons to see all of the applications. Then unplug the sensor electrical connector and remove the bolt with a ratchet and socket.
 Crank Position Sensor Test Failing Ckp Sensor Ckp Test Youtube
It is usually held in place by a single bolt.
How to check crank sensor. Make sure to keep your meter lead wires away from engine moving parts during this test. Broken wires loose wires and signs of burns caused by nearby hot surfaces. A Check Engine Light can also be set off by a wide variety of other issues.
If you dont see any voltage pulses replace the sensor. Look for the CKP sensor at the front or side of the engine see Resources. Park the vehicle and allow the engine and components to cool.
Another issue of a potential problem with the crankshaft position sensor is an illuminated Check Engine Light. As soon as the camshaft position sensor has certain faults then the light of this indicator will come on. A bad reading indicates that the crankshaft sensor isnt working right.
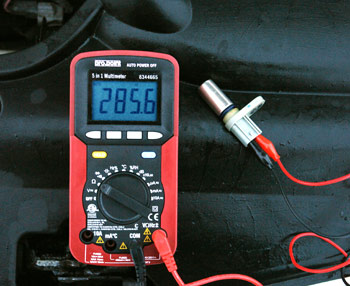
Multimeter spinning resistance Test. The crank sensor on your 46L or 54L Ford pick up SUV or car is a two wire type crank sensor that you can easily and accurately test with a multimeter in Volts AC mode. Always keep a Spare.
Once that is. Here is how you can easily test both your crankshaft position sensor and camshaft position sensor. This can take 30 minutes to an hour depending on how long the vehicle was.
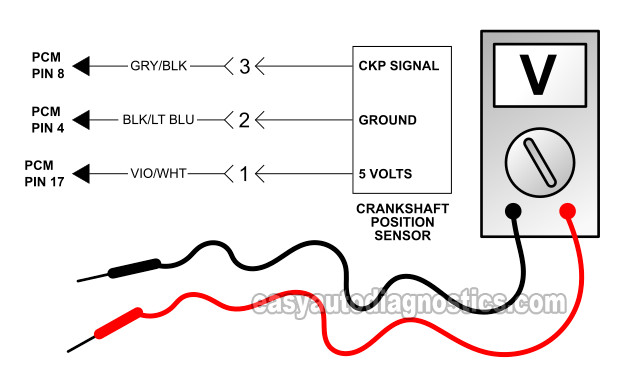
The wire that delivers 12 Volts to the crank angle sensor is the black with white stripe BLKWHT wire of the engine wiring harness connector. Set up the scanner to read engine RPM and crank the engine. To get our crank angle sensor diagnostic started were going to make sure that its getting 10 to 12 Volts DC.
Step 4 - Set the Meter. Testing some pull down type sensors. You have read the three possible ways of the crankshaft sensor test such as.
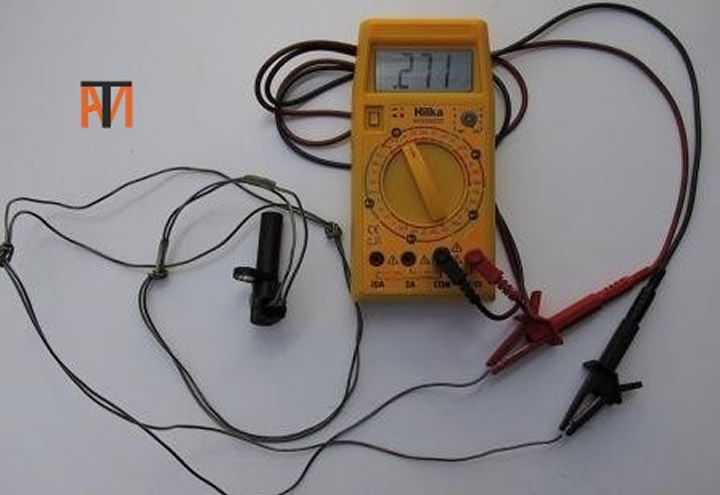
Have an assistant crank the engine for a few seconds while you watch the meters readout. How to Check Your Crankshaft Sensor With an Ohmmeter. The crankshaft position sensor test Im gonna show you here is one of the most effective and sure ways to troubleshoot the sensor using just a multimeter in Volts DC mode.
First check the condition of the sensor electrical connector and wires. Things were fine for about another 5 or 6 months and then about 4 weeks ago the check engine light started coming on again and once again the code was for a the crankshaft position sensor specifically P0335 Crankshaft Position Sensor. Its very important to be able to test these sensor since.
The check engine indicator is on. Making Sure The Crank Angle Sensor Is Getting Power. You get the black probe that.
The first thing to check is to see if youre getting voltage to the sensor from the ECU. Lift the front of your vehicle using a floor jack and support it on two jack stands. Then check for wire damage.
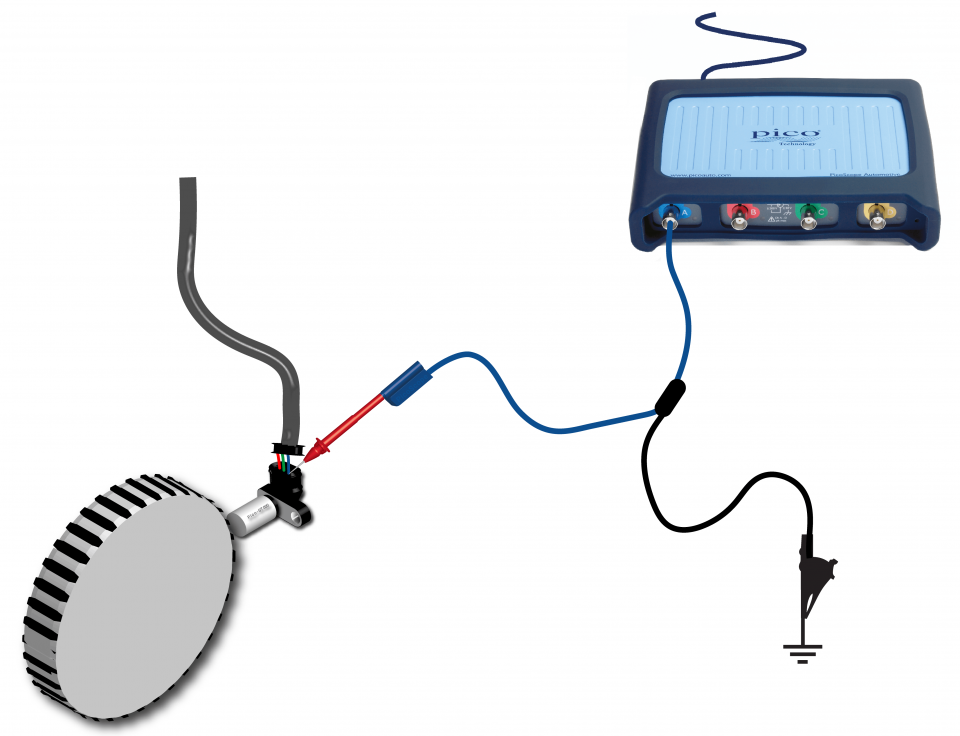
Meter Test insulation and inductance resistance. To test if it your crankshaft position sensor is working properly you have to test the voltage output. Testing A Three-Wire Sensor Now come to the three wire signal crankshaft position sensor test if this is what you have.
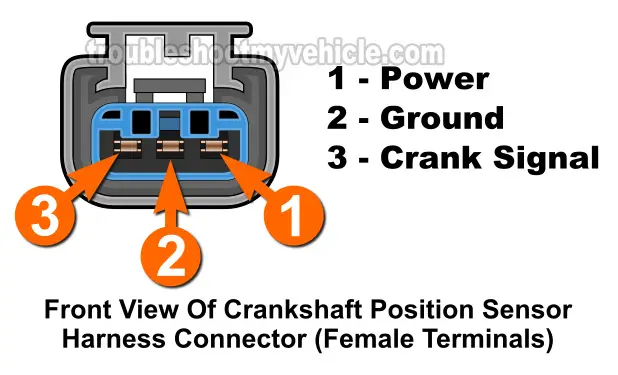
Thats why a professional should scan your vehicle and detect what the particular fault is. Connect your meter leads to the sensor pins. How to Test a Crankshaft Position Sensor.
This time take the multi meter and set DC volts there. If the computer detects a problem with the crankshaft position sensors signal it will activate the Check Engine Light to alert the driver of the problem. Step 1 - Test the Voltage Output.
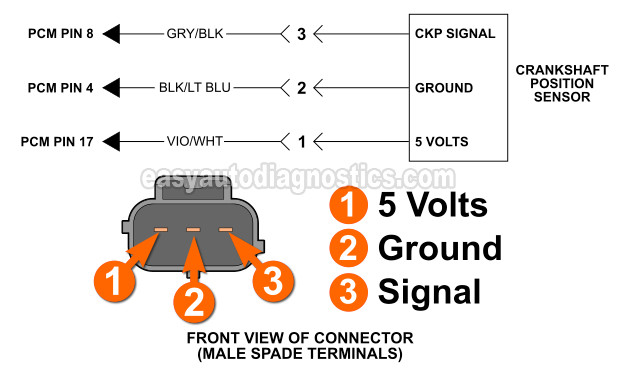
You dont need a scan tool to test the Ford 46L 54L crankshaft position sensor although a scan tool is a must have tool now-a-days. However here you should note that this indicator can also light up for other reasons. Identify three of the wires.
Step 2 - Wiring the Voltmeter. Check the crank sensor with an ohmmeter. If it has more resistance than likely then it is the sensors fault.
The sensor should produce a voltage pulsing signal. Step 3 - Set the Multimeter. The scan tool should read between 100 and 500 RPM.
Unplug the connector and check for rust or contamination like oil that is interfering with good electrical contact. Similarly turn the ignition key on without turning on the. A reading of zero indicates that the crankshaft sensor has failed completely.
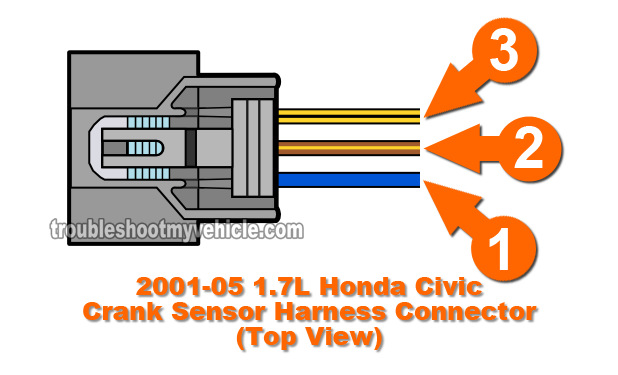 Part 2 How To Test The Crank Sensor 2001 2005 1 7l Honda Civic
 Ask The Mechanic Crankshaft Sensor
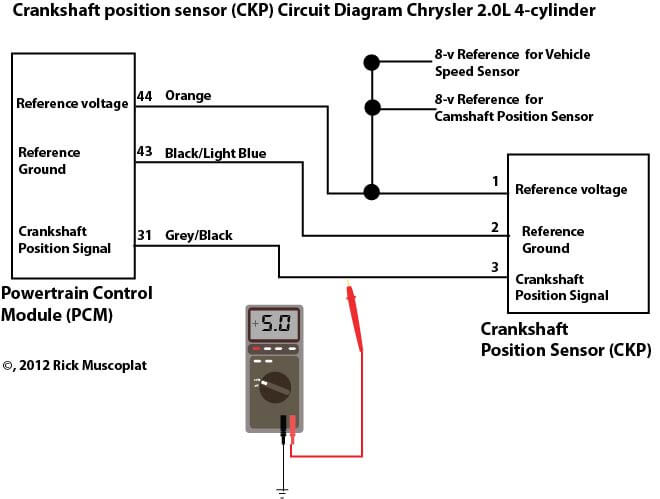 2l Chrysler Crankshaft Sensor Wiring Diagram Ricks Free Auto Repair Advice Ricks Free Auto Repair Advice Automotive Repair Tips And How To
 Part 3 How To Test The Crank Sensor Gm 4 3l 5 0l 5 7l
 Pin On Crank Sensor Test
 Crankshaft Position Sensor How It Works Symptoms Problems Testing

Engine Troubleshoot Camshaft And Crankshaft Position Sensors 3000gt Stealth Wiki
 Part 1 How To Test The Crankshaft Position Sensor 1998 2000 3 0l V6 Chrysler
 Part 2 How To Test The Crankshaft Position Sensor 1997 1999 V8 Dakota Durango
 Engine Troubleshoot Camshaft And Crankshaft Position Sensors 3000gt Stealth Wiki
 Crankshaft Position Sensor Hall Effect Running
 Part 1 How To Test The Crankshaft Position Sensor 1997 1999 V8 Dakota Durango
 Testing Crankshaft Position Sensor Cps Inductive Youtube
 Pin On Ratchets And Wrenches
02 Escape Xlt 3 0l Crankshaft Position Sensor Pulse Wheel Ford Automobiles
 How To Test Crankshaft And Camshaft Position Sensors After Learning How They Work Youtube
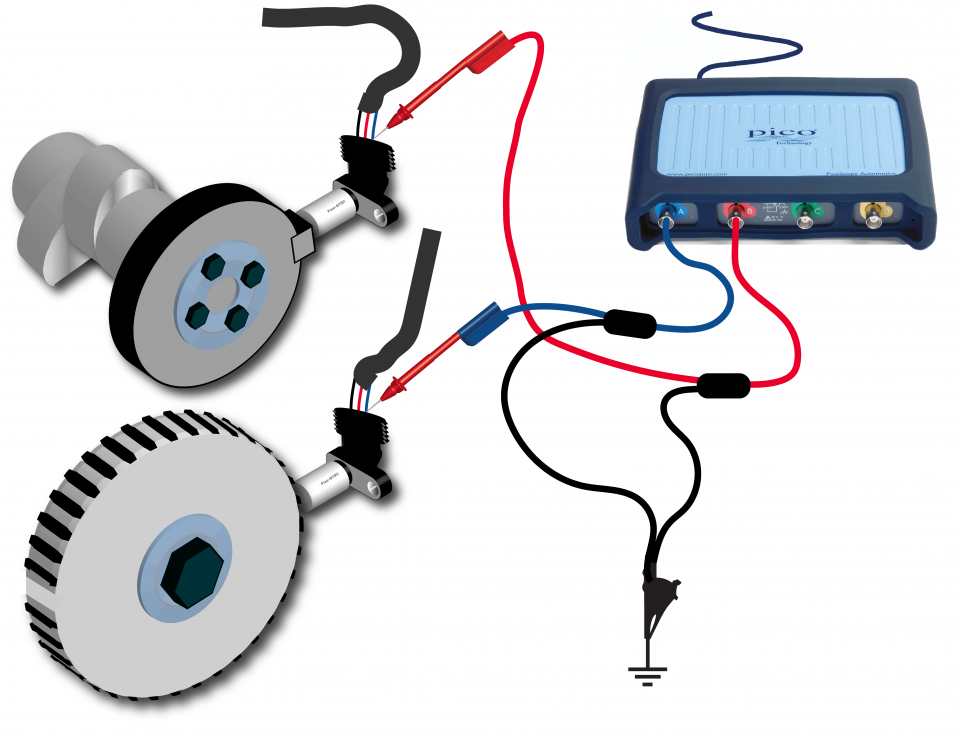 Crankshaft And Camshaft Position Sensor Comparison
 Part 2 How To Test The Crankshaft Position Sensor 1997 1999 2 5l Ohv Dakota